WordPress Global Font Changing Guide
Preface
Often, the fonts called by WordPress by default do not display well. In this case, you can modify the default font of the theme to achieve the desired effect.
The font replacement introduced below is mainly divided into two types. The first is to directly call the system font to replace the original theme's default font; the second is to use an external font file to achieve font replacement.
First Method: Direct Call
This method can be achieved by modifying the CSS file. Some themes come with custom CSS style settings, and WordPress also provides this entry (Backend Management -> Appearance -> Custom CSS). At this time, you can directly fill in:
*:not([class*="icon"]):not(i) {
font-family: Segoe UI, "Microsoft Yahei" !important;
}
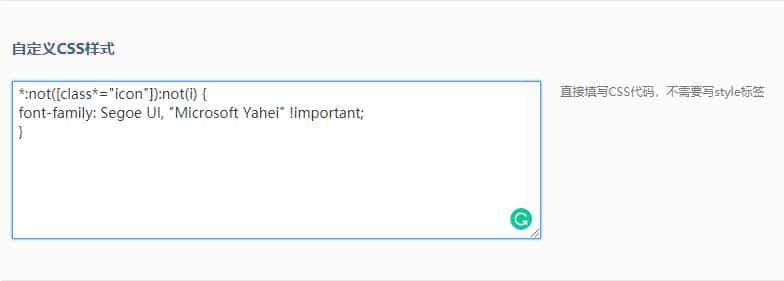
Direct Call
The above example is to globally prioritize replacing the font with Segio UI, and secondly with Microsoft YaHei. Below are a few fonts more suitable for reading for everyone to replace, just replace Segio UI and Microsoft YaHei in the code.
SimSun, Microsoft YaHei ("Microsoft Yahei"), STHeiti Hiragino Sans GB, PingFang SC Arial, Times New Roman, Droid Sans
Second Method: Private Font Call
Since it is a private font, it means it cannot be selected from public libraries and needs to be uploaded to a server for loading.
Here you can choose: 1. Upload to the website server 2. Upload to Github (Recommended) 3. Upload to private cloud storage for calling
Before this, you need to do a preparation work. Font files usually have only one format, and to meet the needs of different browsers, it needs to be expanded into five formats, which are .ttf .eot .woff .woff2 .svg
You can find online conversion tools by searching, for example: Online Font Conversion
1. Upload to Website Server
This method has risks. Chinese font libraries are usually very large. For example, the Source Han Sans currently in use, a single ttf file is 8M+, coupled with the generally small bandwidth of domestic servers, resulting in a greatly extended website loading time.
Upload all the five font formats prepared earlier to a folder on the website, for example, put them in the /fonts folder, and name them uniformly, such as siyuan.ttf, siyuan.svg, etc. Enter the following code in the custom CSS style:
@font-face {
font-family: '随便一个名称,需要和下面的保持对应';
src: url('../fonts/yourfont.eot');
src:
url('../fonts/yourfont.eot') format('embedded-opentype'),
url('../fonts/yourfont.woff2') format('woff2'),
url('../fonts/yourfont.woff') format('woff'),
url('../fonts/yourfont.ttf') format('truetype'),
url('../fonts/yourfont.svg') format('svg');
font-weight: normal;
font-style: normal;
}
*:not([class*="icon"]):not(i) {
font-family: "与上面起的名字的对应" !important;
}
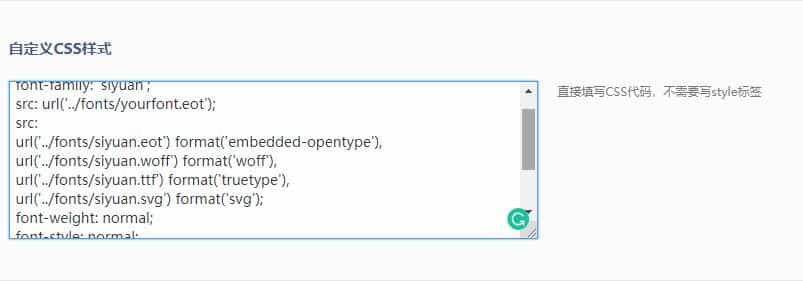
Website Server Call
This method is not highly recommended. It is still recommended to use the cloud storage hosting below.
2. Upload to Github Using Free jsDelivr CDN Acceleration
I won't say much about how easy to use jsDelivr is, and I won't say much about how to use Github here. The general method is to upload your font files to your own Github repository, and then use the acceleration service provided by jsDelivr to call them, which is convenient, easy to use, and most importantly, free.
jsDelivr call format https://cdn.jsdelivr.net/gh/Github Username/Repository Name/Specific Path
Most svg files will exceed 20M. A friend in the comment section reminded that jsDelivr calling files exceeding 20M will report an error. You can use other ways to load svg, but leaving it up there is not a problem and basically does not affect normal use.
Attached are the call links for several fonts (hosted on Github, using jsDelivr acceleration service)
AdobeCleanHanSC
@font-face {
font-family: 'AdobeCleanHanSC';
src: url('https://cdn.jsdelivr.net/gh/Ratodo/Lib/fonts/AdobeCleanHanSC/AdobeCleanHanSC.eot');
src:
url('https://cdn.jsdelivr.net/gh/Ratodo/Lib/fonts/AdobeCleanHanSC/AdobeCleanHanSC.eot') format('embedded-opentype'),
url('https://cdn.jsdelivr.net/gh/Ratodo/Lib/fonts/AdobeCleanHanSC/AdobeCleanHanSC.woff2') format('woff2'),
url('https://cdn.jsdelivr.net/gh/Ratodo/Lib/fonts/AdobeCleanHanSC/AdobeCleanHanSC.woff') format('woff'),
url('https://cdn.jsdelivr.net/gh/Ratodo/Lib/fonts/AdobeCleanHanSC/AdobeCleanHanSC.ttf') format('truetype'),
url('https://cdn.jsdelivr.net/gh/Ratodo/Lib/fonts/AdobeCleanHanSC/AdobeCleanHanSC.svg') format('svg');
font-weight: 400;
font-style: normal;
font-display: swap;
}
*:not([class*="icon"]):not(i) {
font-family: "AdobeCleanHanSC" !important;
}
Source Han Sans
@font-face {
font-family: 'siyuan';
src: url('https://cdn.jsdelivr.net/gh/Ratodo/Lib/fonts/siyuan/siyuan.eot');
src:
url('https://cdn.jsdelivr.net/gh/Ratodo/Lib/fonts/siyuan/siyuan.eot') format('embedded-opentype'),
url('https://cdn.jsdelivr.net/gh/Ratodo/Lib/fonts/siyuan/siyuan.woff2') format('woff2'),
url('https://cdn.jsdelivr.net/gh/Ratodo/Lib/fonts/siyuan/siyuan.woff') format('woff'),
url('https://cdn.jsdelivr.net/gh/Ratodo/Lib/fonts/siyuan/siyuan.ttf') format('truetype'),
url('https://cdn.jsdelivr.net/gh/Ratodo/Lib/fonts/siyuan/siyuan.svg') format('svg');
font-weight: 400;
font-style: normal;
font-display: swap;
}
*:not([class*="icon"]):not(i) {
font-family: "siyuan" !important;
}
Tsukushi A Maru
@font-face {
font-family: 'AWan';
src: url ('https://cdn.jsdelivr.net/gh/Ratodo/Lib/fonts/AWan/Awan.eot');
src:
url('https://cdn.jsdelivr.net/gh/Ratodo/Lib/fonts/AWan/AWan.eot') format('embedded-opentype'),
url('https://cdn.jsdelivr.net/gh/Ratodo/Lib/fonts/AWan/AWan.woff2') format('woff2'),
url('https://cdn.jsdelivr.net/gh/Ratodo/Lib/fonts/AWan/AWan.woff') format('woff'),
url('https://cdn.jsdelivr.net/gh/Ratodo/Lib/fonts/AWan/AWan.ttf') format('truetype'),
url('https://cdn.jsdelivr.net/gh/Ratodo/Lib/fonts/AWan/AWan.svg') format('svg');
font-weight: normal;
font-style: normal;
font-display: swap;
}
*:not ([class*="icon"]):not (i) {
font-family: "AWan" !important;
}
Alibaba PuHuiTi 3.0
@font-face {
font-family: 'AlibabaPuHuiTi';
src: url('https://cdn.jsdelivr.net/gh/Ratodo/Lib/fonts/macos/AlibabaPuHuiTi/AlibabaPuHuiTi-3-55-Regular.eot');
src:
url('https://cdn.jsdelivr.net/gh/Ratodo/Lib/fonts/macos/AlibabaPuHuiTi/AlibabaPuHuiTi-3-55-Regular.eot') format('embedded-opentype'),
url('https://cdn.jsdelivr.net/gh/Ratodo/Lib/fonts/macos/AlibabaPuHuiTi/AlibabaPuHuiTi-3-55-Regular.woff2') format('woff2'),
url('https://cdn.jsdelivr.net/gh/Ratodo/Lib/fonts/macos/AlibabaPuHuiTi/AlibabaPuHuiTi-3-55-Regular.woff') format('woff'),
url('https://cdn.jsdelivr.net/gh/Ratodo/Lib/fonts/macos/AlibabaPuHuiTi/AlibabaPuHuiTi-3-55-Regular.ttf') format('truetype'),
font-style: normal;
font-display: swap;
}
*:not([class*="icon"]):not(i) {
font-family: "AlibabaPuHuiTi" !important;
}
3. Upload to Cloud Storage for Calling
If you store font files on a personal server, the server needs to load web pages, images, etc., while waiting to load fonts, but using cloud storage to call can largely solve the problem of slow website loading.
There are many choices for cloud services. If your website has not enabled HTTPS yet, you can use free Qiniu Cloud Storage. If HTTPS is enabled, you can apply to use free Upyun Cloud Storage or paid Alibaba Cloud OSS. Below is a demonstration using Alibaba Cloud OSS and Upyun Cloud Storage as examples.
First, upload the four formats of font files you prepared earlier to your cloud storage, and the cloud storage needs to be set to Public Read permission.
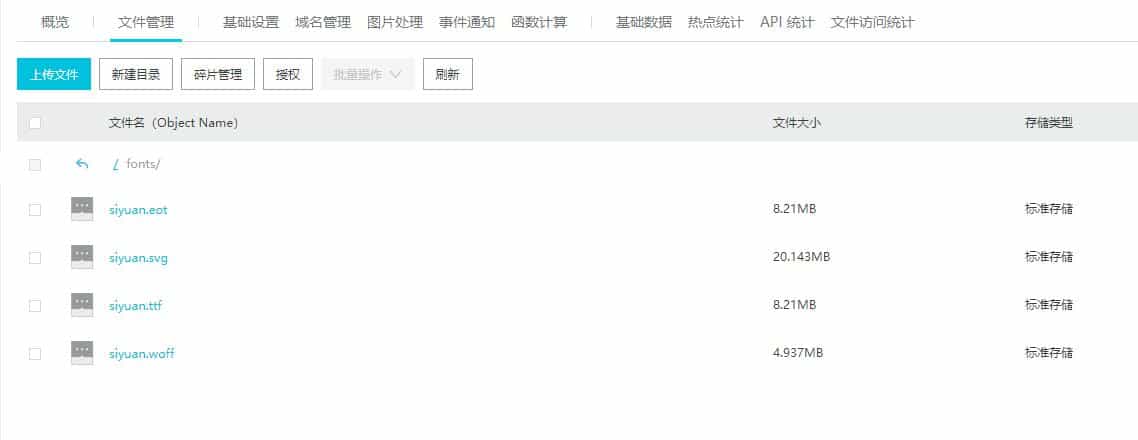
Cloud Storage Call
Then enter Basic Settings -> Anti-leech, add your domain name into it, allow empty Refer, remember to add http(s)://, as shown in the figure below.
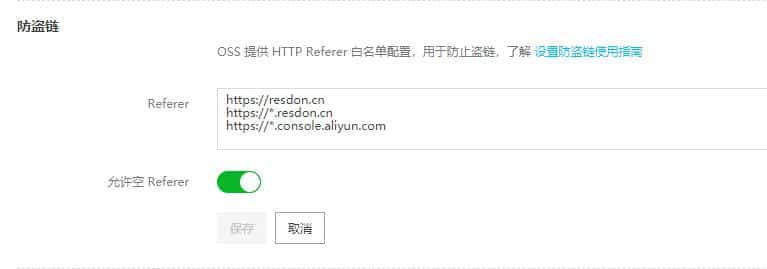
Anti-leech Settings
Next, set the Cross-origin rules, add your domain name into it, also need to add http(s)://, fill in * at Allow Headers
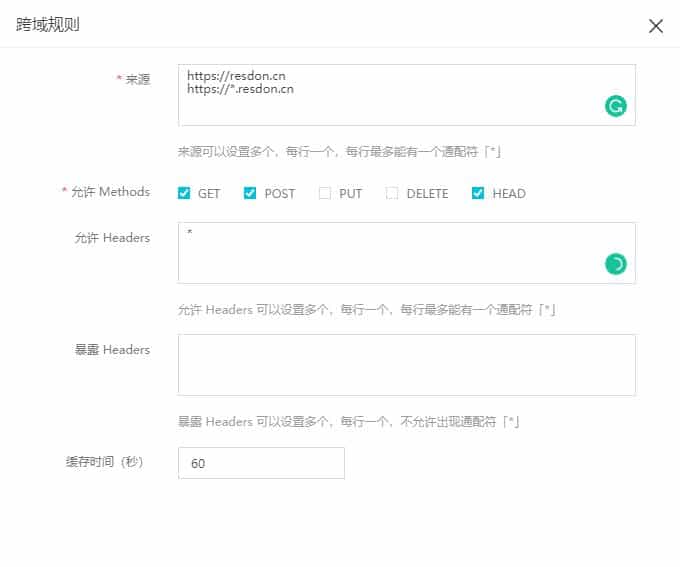
Cross-origin Rule Settings
Next, you can go to custom CSS and fill in the following code:
@font-face {
font-family: '随便一个名称,需要和下面的保持对应';
src: url('../fonts/yourfont.eot');
src:
url('../fonts/yourfont.eot') format('embedded-opentype'),
url('../fonts/yourfont.woff2') format('woff2'),
url('../fonts/yourfont.woff') format('woff'),
url('../fonts/yourfont.ttf') format('truetype'),
url('../fonts/yourfont.svg') format('svg');
font-weight: normal;
font-style: normal;
}
*:not([class*="icon"]):not(i) {
font-family: "与上面起的名字的对应" !important;
}
As for Upyun, after the cloud storage configuration is completed, use an FTP tool to log in to the cloud storage space and upload, then you can use the file's URL address to use it.
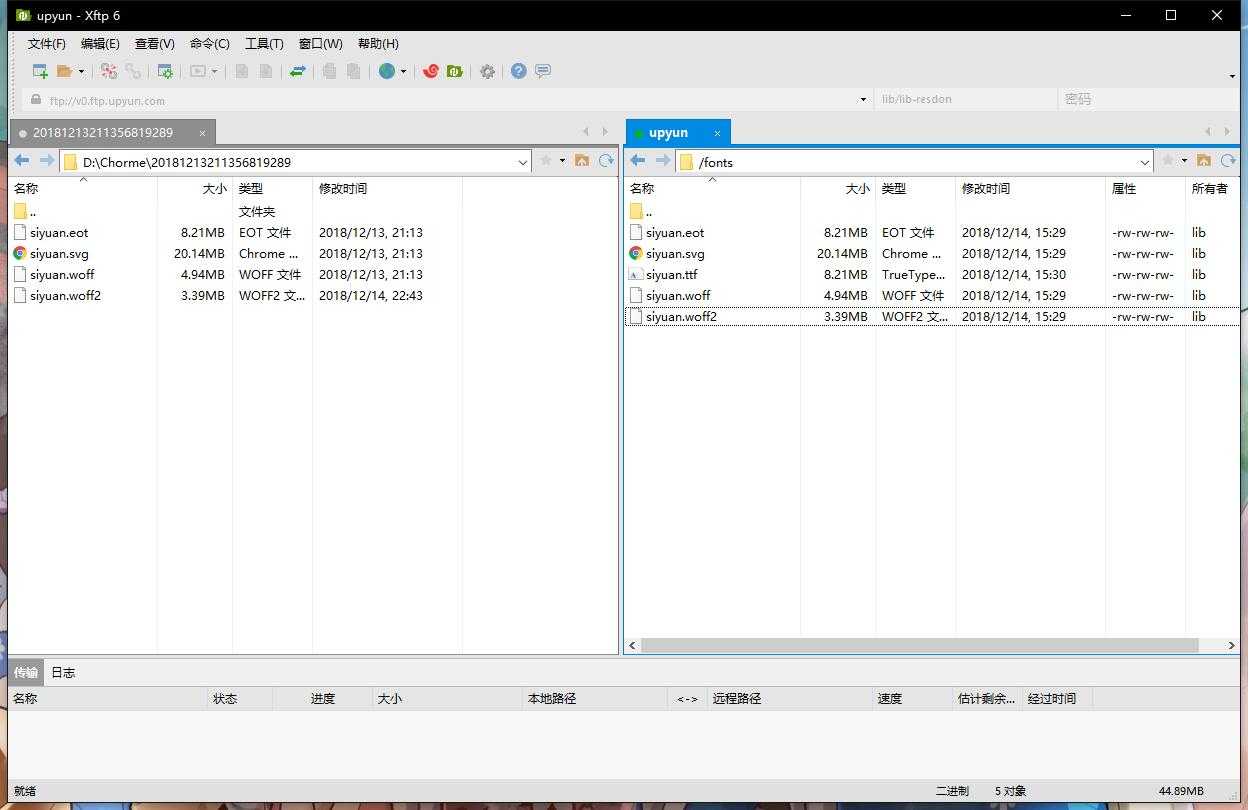
FTP Upload
For the cloud storage connection method of Upyun, please refer to the official document: File Management Guide - Upyun Cloud Storage
Summary
Since there is no very comprehensive font library yet, the second method should be used more often.
If your server bandwidth is large enough, or you have CDN acceleration enabled and are not short of money, putting the font files on the website server is definitely no problem, but if not, it is still recommended to use a cloud storage to help the website load that huge font library.
P.S. There is a program called Font-spider, which can reduce the size of website fonts, but I tried it and didn't succeed, you can also research in this direction.
Update: Font-spider only supports static HTML to compress font size, so WordPress cannot use it directly.